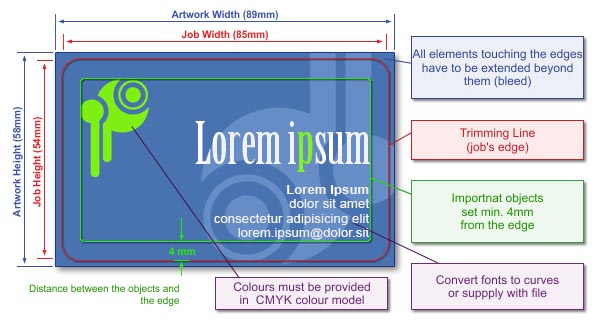
 | Sizes | | Final Trim Size | | Size 54 x 85 mm, rounded corners. (See the picture) | | Full Bleed Size | Full bleed size should be 89 x 58 mm i.e. each edge of the page should be extended by 2mm. If some objects hang of the edges of the project, please cut them off to minimize file size and avoid difficulties with imposition. (See the picture)
PLEASE NOTE!
Even if your artwork does not have any background colours or design elements extended to the bleed area, always use the full bleed size. To ensure the correct size of your artwork, mark it out with a rectangle at the lowest layer (without any outline or filling), or for a bitmap, frame the artwork appropriately. | | Bleed | Artwork background and all objects adjoining the edge of the final piece must be extended over the edges to the bleed. The size of bleed for this artwork should be 2 mm at each side. | | Template | In order to make the designing of your business cards easier we suggest downloading a template to prepare your job with.
|
Download file:
|
| Rounded Business Card Template |
  |
PLEASE NOTE!
The template serves only as a pattern for designing your own business card. Before saving your artwork please remove the template. Otherwise they will be printed together! |
|
| Preparing file for spot varnish UV or Raised Ink 3d | | How to prepare the file for Spot Varnish UV or Raised Ink (3D)? | Prepare additional page(s) in the file (at the end) and apply areas for varnishing in one colour (K100%). The image for spot varnish must not contain greyscale. Even the slightest or brightest greyscale elements get automatically converted into black and will be varnished.
Spot varnished elements must meet the following requirements:
- Design lines must be at least 0.4 mm thick.
- The distance between individual elements must be at least 0,5mm.
- Font size must be at least 14 pt.
Varnish may be shifted up to 0.3 mm in respect to printed elements.
3D Raised-Ink Spot Varnish
- Varnish thickness of 25–35 micrometres (distinctly tactile).
- Applying varnish up to the bleed is not recommended because it may chip off during cutting. Files containing a mask for 3D varnish prepared up to the bleed will be accepted for production at the customer's own risk.
- For 3D raised-ink finishing, the varnish can be applied to one side only.
- For double-sided printouts, 3D raised-ink varnish is applied to the first page (the face). For such jobs, please prepare a 3-page file in the following order: face/back/face mask.
UV Spot Varnish
- Varnish thickness of 10–15 micrometres.
- Applying UV spot varnish up to bleed and on scores is not recommended because it may crack.
This does not apply to small elements/patterns where cracked varnish would be hardly visible.
- For UV varnish finishing, double-sided application is possible. For such jobs, please prepare a 4-page file containing: face/back print (pages 1 and 2 in the file), face/back mask (pages 3 and 4 in the file).
- Do not design varnish on scores.
PLEASE NOTE: Do not design any elements to be coated on the reverse of larger elements coated on the front side, as they may get impressed on these elements and may cause finished pieces to stick together.
PLEASE NOTE: The application of spot varnish or Liquid Metal creates most impact on small elements and lines that do not exceed 4 mm in width. For elements with a size of 5 x 5 mm or larger, where the whole area is to be covered with solid varnish / metallic film layer, using Soft-Touch laminate underneath is recommended. If matte or glossy laminate is used underneath such elements, the coating may be uneven and the final product quality may appear defective.
Please note: In the case of long-run jobs or if the varnished area exceeds the final trim size by 15%, the turnaround time may be extended to 5 working days.
File names should clearly indicate their purpose (mask, obverse / reverse) |
|
| Graphics | | Colour Model | Prepare your artwork in CMYK model (except for artwork with additional colour). If your artwork contains halftone images (textures, photos), convert it also to CMYK.
Using different colour spaces or colour models in one document (e.g. CMYK and RGB) leads to incorrect colour rendering and is not covered by warranty. | | Rich Black | To achieve solid, saturated black, use black composed of the following components: 33%C 33%M 33%Y 100%K. | | Tone Gradation | Do not set your tonal range for values smaller than 5%.
| | Optimum Resolution | | Optimum resolution for bitmaps (graphics, photos) is 600dpi.
| | Layout | Turn the artwork by 90 degrees to check if bitmaps rotate correctly.
Set all texts on a separate top layer.
In case of saving your artwork as CDR file, please group all the objects and convert all fonts to curves/paths.
In your file please define your artwork size in accordance with above mentioned size and place your artwork centrally on a page.
If you save as EPS file the artwork which has no background (white), please frame it to above mentioned size.
Given the base positioning tolerance, there may be some shift in the job relative to the utility. Therefore, we discourage placing any kind of frames around the project, whose non-centricity on the utility can be seen.
All pages in the file should have been done in the same print orientation.
By default utilities are reversed "Head to Head". |
|
| Preparation for personalisation | For personalised print, you need to prepare an additional database. Instructions for preparing this are available in a different section:
See how to prepare personalisation |
|
| Saving to File | | File Formats | Preferred: PDF
Accepted: (unrecommended) CDR, TIFF i JPG (in other resolution than 600/300 dpi).
| | Additional Information | If you have text in your artwork please remember to convert it to curves / paths or attach used fonts to your file (refers only to PDF files).
Don't convert texts to bitmaps!!!
If your artwork consists of more than one page, please save all pages in a single file. If the chosen file format does not allow for saving all pages in one file, please save them in two separate files named face and reverse. (projekt_awers.tiff, projekt_rewers.tiff)If Curved Line Trimming has been selected, the artwork containing the shape to be cut out should be saved in a separate file (using the word 'ciecie' [which translates to 'cutting' in English] in the name.
You can add preview to your artwork (you must write 'preview' in the name of the file).
For artwork with an underprint, please see the Graphics section (above) on how to prepare files.
If you send more than one file, please send them in ZIP format if possible.
In case of TIFF files please save them as single layer files, with no additional channels.For complex projects with multiple layers, overlapping graphics, shadows, transparencies etc., as far as possible, flatten to a single background image, retaining texts, logos, lines and other important elements of the project in the vector form only. In particular, this problem concerns CorelDRAW X4, where in extreme cases, despite a good-looking PDF file, the printout may contains errors. |
|
| Additional Information | | Please keep in mind that due to differences in printing technology and colour presentation, some differences in colours may occur also when compared to inkjet printouts or colours displayed on a computer screen.
Using dark solids on both sides of the card may result in visible chipping off of ink; that is why you should make one side brighter.
Avoid printing white, thin text on dark background – ink spreads out slightly on plastic, making white text illegible. |
|
|
|
|
|